12.1.1.1.3. Ensure That Clients Trust the Issuer
In most cases, if you
obtained your certificate from a well-known certificate authority, your
client computers will already trust the certificate. However, if you
used an internal certificate authority or another third-party CA, you
may have to add the CA to the trusted CA list on your client computers.
This is typically the case with self-signed certificates. You can do
this manually by installing the CA's certificate on each of the client
computers. Or, if your clients are joined to an Active Directory domain,
you can use an Active Directory Group Policy Object (GPO) to issue the
certificate.
To manually install the CAs certificate on your clients, use these steps:
Open the Microsoft Management Console (MMC) on the client by running mmc.exe.
In the MMC, choose File => Add/Remove Snap-In.
In
the Add Or Remove Snap-Ins dialog box, select the Certificates snap-in
from the list on the left and click the Add button in the center of the
dialog box.
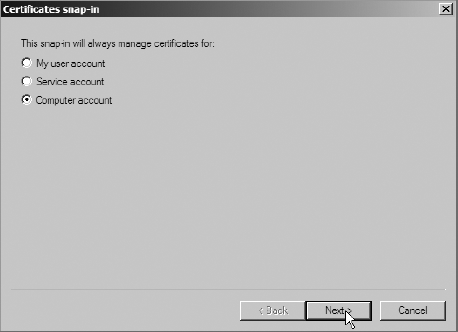
You
will be prompted with the Certificates Snap-In dialog box. This dialog
box is asking you for the certificate store that you want to edit.
Select the Computer Account option, as shown in Figure 1, and click Next.
In the Select Computer dialog box, select Local Computer and click Finish.
When back in the Add Or Remove Snap-Ins dialog box, click OK to close the dialog box.
In the Certificates Snap-In in the MMC, use the tree in the left pane to browse to the Certificates (Local Computer) => Trusted Root Certification Authorities => Certificates node.
Choose Actions => All Tasks => Import to launch the Certificate Import wizard.
On the Welcome page of the wizard, click Next.
At
the File To Import screen, click the Browse button to find the CA's
certificate file. After you have selected the CA certificate file, click
the Next button in the Certificate Import wizard.
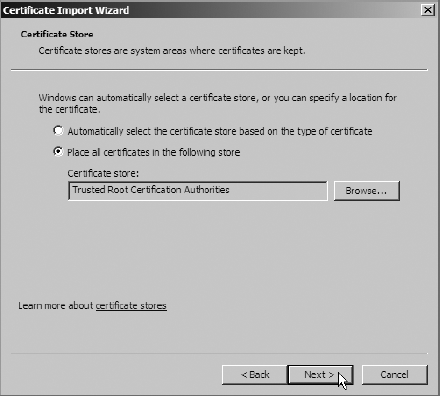
On the Certificate Store page, ensure that the option Place All Certificates In The Following Store is selected.
Also make sure that Certificate Store is set to Trusted Root Certification Authorities, as shown in Figure 2. If not, you can change it using the Browse button. Click Next to continue.
On the Completion page, click Finish to import the CA's certificate into the store.
You
may be prompted with a Security Warning dialog box indicating that
Windows could not validate that the certificate is from the CA that it
says it's from. If you know that the certificate is really from the
source CA, you can click the Yes button to continue. If you receive a
dialog box indicating that the certificate import was successful, click
OK.
You can also deploy the CA's
certificate with an Active Directory GPO. Using Active Directory GPOs
is outside of the scope of this book. However, if you are familiar with
using GPOs in Active Directory, you can add the certificate to a domain
GPO under Computer Configuration => Windows Settings => Security Settings => Public Key Policies =>
Trusted Root Certification Authorities. Any certificates that you
import into this policy will be added to the Trusted Root Certification
Authorities list in the certificate store on the computers that are
affected by the Group Policy.
2. Secure the Transport Layer
Deciding how you are going to
secure the Transport layer of your Exchange system is an important step.
You can use the guidelines in this section to develop a good strategy
of securing your transport environment.
2.1. Define a Transport Security Model
Exchange includes the Edge
Transport role for the purpose of having a nondomain-joined Exchange
server with advanced antispam functionality outside your network. This
strategy of securing the outer layers of the network as a first line of
defense is a great example of a concept known as defense in depth.
Defense in depth ensures that there are multiple layers of security
between your access points and the data. This is a risk mitigation
approach. You can't guarantee that someone won't break through your
first line of defense, but when there are many other fences to climb
before reaching your backyard, the target looks less and less
attractive.
Another consideration is
that every message now flows through a Hub Transport server. Because of
this, you may want to consider performing antivirus scanning at the Hub
Transport server. Hub Transports are typically less utilized than other
server roles, so the added burden of scanning messages for viruses will
probably have a minimal impact on those servers. And since every message
filters through a Hub Transport, you can be certain that every message
is scanned. If you are concerned about scanning the data on the database
side, one option is to rely on the antivirus software on the client
computers instead of performing the virus scanning on a Mailbox server.
2.2. Install Antispam Functionality on Hub Transport Servers
By default, Edge
Transport servers have antispam functionality enabled. However, Hub
Transport servers do not have it enabled because they typically are not
Internet-facing. If you have Internet-facing Hub Transport servers,
however, you can enable antispam functionality for those servers.
Exchange exposes the
ability to turn on the antispam features in Hub Transport servers
through the use of an EMS script. This script, Install-AntiSpamAgents.ps1,
is kept in the Scripts folder in the folder where the Exchange files
are stored. You can use the following steps to enable the antispam
capabilities on the Hub Transport servers:
Open the EMS and navigate to the Script folder under the location that the Exchange files are stored—for example, C:\Program Files\Microsoft\Exchange Server\v14\Scripts.
Run the script Install-AntiSpamAgents.ps1 using the following command in the EMS:
.\Install-AntiSpamAgents.ps1
After the antispam agents are installed, restart the transport service using the following EMS command:
Restart-Service MSExchangeTransport
After the antispam
configuration is complete, you will see the antispam settings appear in
the EMC if you open the EMC and look under the Hub Transport nodes in
the Organization Configuration and Server Configuration nodes.